Quickstart
This small tutorial will give an overview on how to get started with Togglz.
Installation
First add following dependencies to your project:
<!-- Togglz for Servlet environments (mandatory) -->
<dependency>
  <groupId>org.togglz</groupId>
  <artifactId>togglz-servlet</artifactId>
  <version>3.1.2</version>
</dependency>

<!-- CDI integration (optional) -->
<dependency>
  <groupId>org.togglz</groupId>
  <artifactId>togglz-cdi</artifactId>
  <version>3.1.2</version>
</dependency>

<!-- Spring integration (optional) -->
<dependency>
  <groupId>org.togglz</groupId>
  <artifactId>togglz-spring-web</artifactId>
  <version>3.1.2</version>
</dependency>
If you deploy your application to a Servlet 3.0 container, you won't have to do any further configuration. In case your container doesn't support Servlet 3.0, you have to manually register the required filter. Please refer to Installation for details.
Configuration
First create your feature enum class:
public enum MyFeatures implements Feature {

    @EnabledByDefault
    @Label("First Feature")
    FEATURE_ONE,

    @Label("Second Feature")
    FEATURE_TWO;

    public boolean isActive() {
        return FeatureContext.getFeatureManager().isActive(this);
    }

}
The next step is to create an implementation of TogglzConfig:
@ApplicationScoped
public class DemoConfiguration implements TogglzConfig {

    public Class<? extends Feature> getFeatureClass() {
        return MyFeatures.class;
    }

    public StateRepository getStateRepository() {
        return new FileBasedStateRepository(new File("/tmp/features.properties"));
    }

    public UserProvider getUserProvider() {
        return new ServletUserProvider("admin");
    }

}
See the following short description for a description of each method:
-
getFeatureClass(): This method is used to tell Togglz about your feature enum. Just return the class of the enum here. -
getStateRepository(): This method must return the feature state repository which is responsible to persist the state of features. This example uses theFileBasedStateRepositorywhich uses Java property files to save the feature state. But Toggles provides several other implementations. Please refer to State Repositories for details. -
getUserProvider(): This method returns a provider class that is responsible to tell the FeatureManager which is the current user. Togglz provides out-of-the-box integration with many popular security frameworks. Please refer to User Authentication for details.
Usage
Using Togglz is very simple. To check if a feature is active just call the isActive() method of the corresponding feature enum value:
if( MyFeatures.FEATURE_ONE.isActive() ) {
  // new stuff here
}
Admin Console
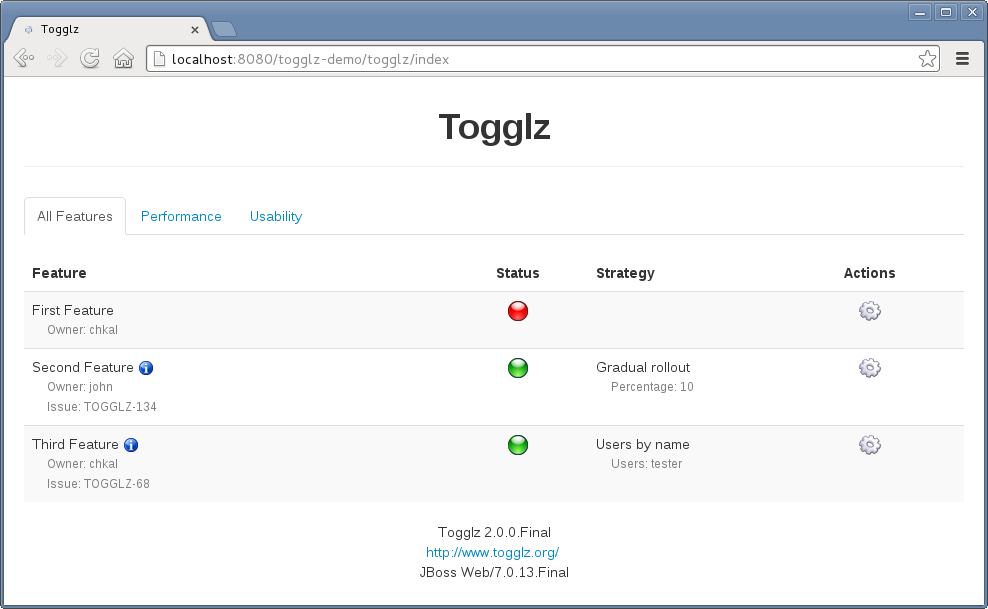
Togglz ships with an embedded admin console that allows you to toggle your features:

To enable the embedded Togglz admin console, add the following dependency to your pom.xml:
<!-- Togglz Admin Console -->
<dependency>
  <groupId>org.togglz</groupId>
  <artifactId>togglz-console</artifactId>
  <version>3.1.2</version>
</dependency>
If you deploy your application to a Servlet 3.0 container, you won't have to do any further configuration. If your
container doesn't support Servlet 3.0, you will have to manually add the TogglzConsoleServlet to
your /WEB-INF/web.xml. Please refer to Installation for details.
The admin console will be available in a virtual path named togglz within you application. So if you application is deployed to a context path named myapp within the container, you will have to use the following URL:
http://localhost:8080/myapp/togglz/
JSF integration
To make use of the JSF integration features, add the following module to your pom:
<!-- JSF integration -->
<dependency>
  <groupId>org.togglz</groupId>
  <artifactId>togglz-jsf</artifactId>
  <version>3.1.2</version>
</dependency>
The JSF integration provides a very simple way to render page content depending on whether a feature is active or not:
<h:panelGroup rendered="#{features['FEATURE_ONE']}">
  <!-- Some part of the page required for FEATURE_ONE -->
</h:panelGroup>
Spring Boot Starter since 2.3.0
If you are using Spring Boot there is an alternative installation approach by using the togglz-spring-boot-starter module.
This starter will install the common Togglz dependencies and will also perform auto configuration.
See the Spring Boot Starter chapter for more info.
